
Blogging for Profits Series Part 3: How To Install A WordPress Blog
This post contain some affiliate links.

Notice About Photo: This is an original photo created for this blog. No use allowed without permission.
In this post:
- How to Install WordPress on 1&1
- How to Install WordPress on Bluehost.co
- How to Install WordPress on DreamHost
- How to Install WordPress on Hostgator
- How to Install WordPress on SiteGround
Congratulations! Now that you’re ready to take action, your first action step is to actually set up your WordPress blog. If you’re not familiar with WordPress, it is an open source, free blogging software, that millions of bloggers use. There are certainly other blogging software available but WordPress is THE number one choice.
This portion of the Blogging for Profits Series is a little techie. But don’t be intimidated because it’s only a matter of time and you’ll find how breeze it is to set-up a WordPress blog! Especially with all the one-click installer that’s now available in hosting platforms.
Since we’re going to use a self-hosted, stand alone WordPress, you are going to need the following:
1. Your Own Domain Name
![]() Having your own domain name is a must. There are some bloggers that use their name but there are also those that prefer not to use their name. For my own blog, I decided not to use my own name because I have a goal in mind in the future.
Having your own domain name is a must. There are some bloggers that use their name but there are also those that prefer not to use their name. For my own blog, I decided not to use my own name because I have a goal in mind in the future.
It is totally up to you on what you want to use but here are some quick tips:
a. Avoid using a very long domain name such as www.thisismydomainnameandyoufindmehereblog.com.
b. Make sure it is easy to remember.
c. Make it catchy if possible.
d. If possible, incorporate it with a main keyword for your niche (only if it will not make the domain long).
I highly recommend Godaddy.com to register your domain name with simply because they offer the cheapest domain name registration out there. If you’re not a Godaddy.com customer yet and it’s your first time signing up with them, you can register your .COM domain for $0.99. Click here to avail of that.
2. Get a Hosting Plan
If you are not committed yet with any hosting company, here are some of the hosting companies that are rated as the Best Web Hosting companies in 2017 by PC Mag .
Bluehost.com
Bluehost.com, at the time of this writing, is currently offering a FREE domain name registration when you purchase a hosting package with them. Their current introductory rate is $3.99 (normally $7.99). I’d say this is such a good deal, especially if you’re just starting up. However, their Optimized WordPress Hosting starts at $19.99.
What I love about Bluehost.com is their 24/7 support via chat and toll-free 844 number. I’ve always loved being able to access customer support via chat. It just gives me the peace of mind knowing that whenever my site is down or is having issues that I will be able to speak with someone.
Click here to sign-up with Bluehost.com
Unlike DreamHost, Bluehost.com uses a MOJO Marketplace installer which is also a “one-click” installer.
Here’s an instruction on how to install WordPress using MOJO Marketplace in Bluehost.com:
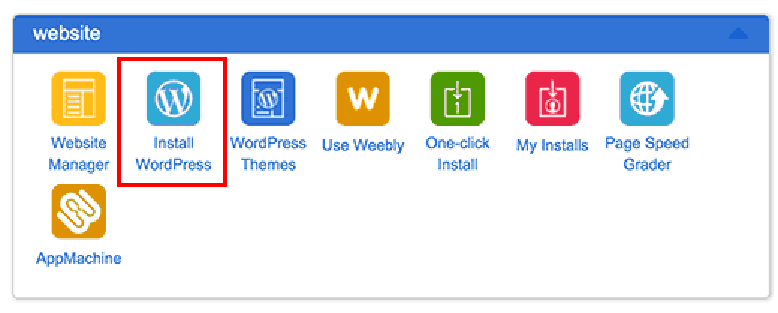
- Log-in to your Bluehost hosting account. Once inside the Cpanel, scroll all the way down to where it says “Website” section. You will see something like the below image.
- Click on the Install WordPress icon. When you click on that, it will take you to a page that gives you a WordPress overview.
- Click on the green INSTALL button.

- Enter the domain name for your blog.

- The installer will check to make sure everything is in order and will show you the Advanced Options. Click on it to expand it. Fill in the information and hit the green INSTALL NOW button.

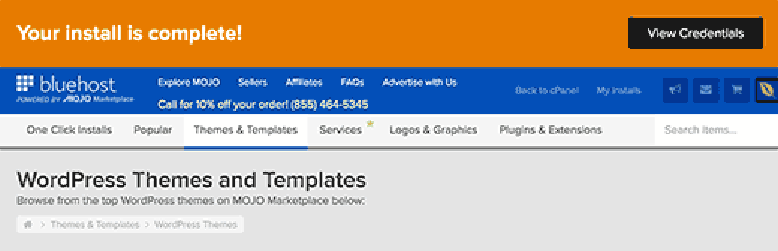
- Once the installation is complete, it will show you a page as shown below. When you click on the VIEW CREDENTIALS button on the top right hand side, it will take you to a page with the credentials that you need to login to your WordPress blog.
DreamHost
DreamHost specializes in WordPress hosting. They have a Shared Hosting for WordPress and a Dreampress which is 5x faster than the shared hosting and has a Jetpack Premium installed for advanced back-ups and security. This is a paid plugin that normally costs $99/year separately.
The shared hosting costs $10.95/month if billed monthly while Dreampress is $16.95/month if paid 3 years in advance. If budget is tight, it’s okay to sign-up for their monthly. But annual payments can save you a few dollars here and there.
I highly recommend Dreamhost because of their managed WordPress hosting. Do NOT sign-up with any hosting company that doesn’t have a managed WordPress hosting because it will be extremely difficult for you to install and handle your blog. All 4 hosting companies mentioned above have managed WordPress hosting.
CLICK HERE to sign up with DreamHost.
Here’s the instruction from DreamHost on how to install WordPress in their platform:
- To install WordPress at DreamHost, log into your panel and go to the Goodies section at (Panel > ‘Goodies’ > ‘One-Click Installs’).
- From the list of One-Click-Installs click ‘WordPress’.
- Enter the following:
- Install to: Select the domain you’d like to install into. The second textbox is if you want to install into a subdirectory (if you do not want it stored in the primary directory). For example, if you want it installed into example.com/blog first select example.com in the first dropdown menu. In the second textbox type in blog.
- Select Database: You probably want ‘Automatically Create Database’ since this creates a new unique database for your site. You can also choose an existing database if you like.
- Deluxe Install: It’s recommended you check this box if you would like the extra features mentioned below. This is a free addition to your install.
- Click Install it for me now!. You’ll then receive an email to the primary email listed on your DreamHost account. This email details further steps to take to complete the installation.
See image below to demonstrate what you can expect when you log in your DreamHost hosting.

Hostgator
Hostgator‘s managed WordPress hosting seems to be promising because it supposedly is a cloud hosting, which means that it’s 2.5x faster than regular or shared hosting. If your blog will have a lot of photos such as a fashion, food, arts and crafts, travel, or lifestyle blog, then cloud hosting is very beneficial. You will avoid slow load times.
Most cloud hosting plans are pretty pricey but Hostgator is offering it as cheap as $5.95/month as their introductory rate! That’s 40% off their normal rate. If you know that you’re going to be in the blogging business for the long run and you will be hosting a lot of photos, I would suggest trying out Hostgator’s WordPress cloud hosting.
Click here to sign-up with Hostgator
Once you sign-up with a hosting plan, you will receive an email with a link to the cPanel which is usually yourdomainname.com/cpanel and the log-in information.
Here’s an instruction on how to install WordPress using Fantastico in Hostgator:
- When you log-in, you should see something similar below. Look for the Fantastico icon which is a blue smiley face and then click on it.

- When you’re in Fantastico, look for the WordPress link and click on it.

- Click on New Installation.

- Fill in the necessary information and then hit the Install WordPress button.

If the installation is successful, you will get a screen that says so. Go ahead and log-in the WP admin panel using the user name and password that you have entered above to make sure that the credentials work.
SiteGround
For as little as $3.95 (introductory offer), you can get your blog started at SiteGround. Just like DreamHost and Bluehost.com, their WordPress hosting is also managed which means that you can get full support on your hosting which includes back-ups, security, and updates. Please keep in mind that managed WordPress hosting is not standard with all hosting companies that’s why I picked the 5 companies I mentioned here.
Another thing I liked about it is they have WordPress Staging in their platform. This means that you can experiment with different themes in your blog or make changes in the WP Staging without affecting the live website. Once you’re ready to make changes, then with just one click, you can migrate all those changes and make it live.
In addition, they also have a toll-free number and a live chat for customer support.
Click here to sign-up with SiteGround
SiteGround has their SiteGround Wizard to install WordPress and they also have Fantastico. To install WordPress using Fantastico, click here.
Here’s the instruction from SiteGround on how to install WordPress using SiteGround Wizard:
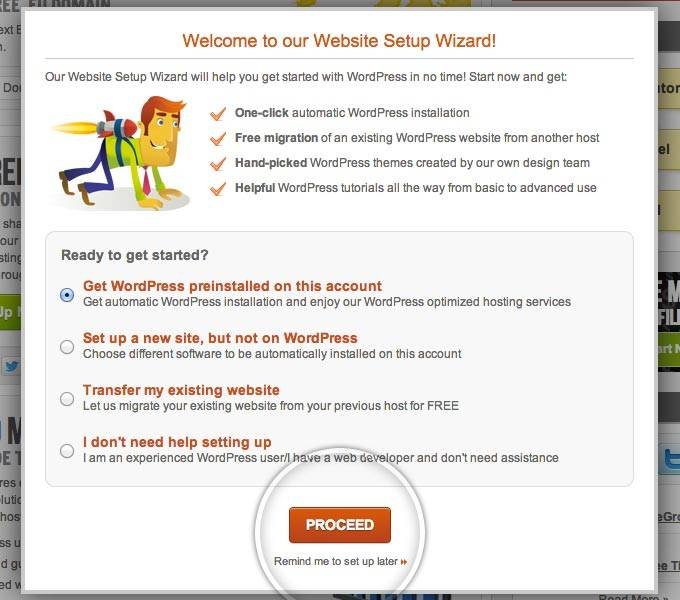
- To install WordPress using the SiteGround Wizard, first access your Customer Area. After you signup for our WordPress hosting package you will receive all the necessary information you need to login.Once you login to your Customer Area for the first time, you will see a popup asking you if you want to have WordPress preinstalled on your account. Select that option and click on the Proceed button.
- The next page consists of two parts. In the first one, enter the login information for your new WordPress application.

- Pick one of the free WordPress themes available in the Wizard and click on the Submit button once again.

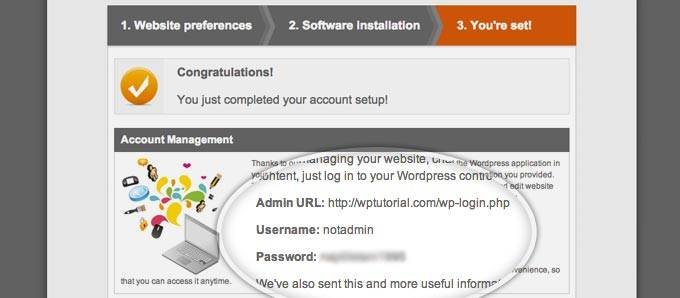
- Finally, you will see a quick summary of your WordPress installation, including from where to access your admin area, your username and your password.
If it works, you’re done with Action Step #1! Give yourself a pat in the back! The next part of the series is another technical aspect but it’s going to be fun! I will show you how to customize your WordPress blog to make it look more professional!
Hope you find this guide useful and if you do, please feel free to share them to your friends, family, and colleagues! Show me some love too by leaving me comments below!
READ ALL THE OTHER PARTS OF HOW TO MAKE MONEY FROM BLOGGING SERIES
- Blogging for Profit Series 1: The Foundation
- Blogging for Profit Series 2: Taking Action
- Blogging for Profit Series 3: How To Install A WordPress Blog
- Blogging for Profit Series 4: How to Install a Professional WordPress Theme
- Blogging for Profit Series 5: 3 Easy Techniques to Build Great Content for a Successful Blog
- Blogging for Profit Series 6: 6 Surefire Ways to Make Money From Your Blog
- Blogging for Profit Series 7: 10 Ways Guaranteed to Drive Traffic to Your Blog
- Blogging for Profit Series 8: 7 Important Tips for a Successful Blogging Journey